Thursday, May 24, 2012

Two years later...

Hey, y'all! I'm about 3 weeks away from my two-year anniversary of purchasing my home. I cannot believe how time has flown! I have recently begun painting my main level living and dining room, as well as the hallway. It's not complete, but I'm afraid it might be a while before I can post finished pictures.

Anyway, here are some updates of what's been happenin' around the house...

Living Room Gets a Facelift
With just under a hundred different wood types and tones, 
here is what the living room looked like when I initially purchased the house. 
However, the color on the wall was not this bright of a white, it was more of an "eggnog" color.


After I painted the fireplace (this was done a while ago).

Here is a picture of what it looked like recently, before I started painting. Sorry it's so dark.


Miss Bevin and I started painting the long wall first. 
I chose a shade of darker grey, "Smokey Day", for an accent wall. I love having the long 
wall a darker color, because it really brings the living and dining rooms together.


We then moved on to the lighter grey "Windsor", 
which is a few shades lighter than the accent wall. 
Lauren helped me MAJORLY with this project. We've both been painting our butts off! 

Two things: 
1. Once there was a strip of the grey in the hallway (below), I realized that the hallway was 
actually GREEN before..instead of the weird yellow color.
2. Isn't this trim color awful with the cool tones of the paint? I think so, too.


The hallway after being painted the grey. Yes, I realize that it looks pinkish purple--
that's what you get for using a camera on your phone. At least it looks much cleaner.

Then we started painting the trim... Lesson Learned: It is a NEVER-ENDING process! 
Here is a picture of my main front window before painted.

After the window is painted--Holy Freshness!

On to the rest of the trim we go... This is with the morning light coming in. I just love that big window now! I'm trying to decide what to do with the window treatments. I want to keep it as light and airy as possible, but without losing the privacy of dark curtains.... so we'll see what happens. Thoughts welcome!

Trim...

I plan to paint the hallway doors the dark grey color. I'm just sick of all the wood--blugh!

Trim...


...and more trim. Don't mind the thing hanging on the wall--
I just wanted to get it off of the floor-- it's definitely not going to stay there. 

Since I have moved into this house, the yellow glow of the sconces have driven me nuts-- 
to the point of not even turning them on...ever. On the right, you will see the original sconce, and on the left, you will see one that I made (like father, like daughter right?) Removing the yellow glass keeps it from looking dingy, and adding the box around makes a cool shadow! 
White light from the sconces makes it feel more updated, I think.

Here is a picture with both built, and everything put together! 


I thought I would share this, too. Lauren is working on her room now--
she likes to mix and match tools with kitchen utensils. :)

I'm still working on many, many touch-ups and finishing some trim work, so my work is definitely not done. Hopefully this summer will be another project-filled one-- Feels good to be blogging again!

Saturday, August 27, 2011

Living Room


I finally feel that my home is arriving to a point in which I can rest for a while! Here are a few before and after pictures of the living room. 
Before, as the previous owners had it. 


When it was first a "catch all" room.. shortly after moving in.

First project was painting the fireplace. 

Recently, I received this coffee table..

Before I painted it.

After! It's actually not this "chocolate" color, the flash makes it look lighter than it is.

A better picture with more accurate color. Matches the fireplace!

 Cozy..ready for cooler weather.

The new addition to the house... my FAVORITE chair in the world. 

A few new pillows for the couch, solid print, but with textured material. 

Definitely filled up the big room.

Fabric for a project I had in mind...

These are random rectangular wood pieces that were used in the packaging of my bedroom furniture. I decided to keep them to use for something like this in the future.

These will eventually be hung to make them look more uniform. But I have been in a pattern kick, and I love putting different patterns together. 

Fabric canvas offering the aesthetics of a painting.

I'll keep you updated on what I decide to do further with my room. It's pretty much the only room that I have left  to do something with. Since I'm having trouble trying to figure out exactly what that will be, it will stay just as it is!

Saturday, August 20, 2011

Guest Bedroom/Dresser

Just a quick post on a couple of projects I have been working on.

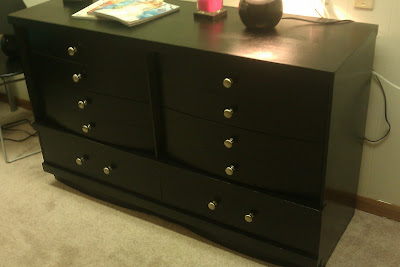
This is a picture of a dresser that was used by all of my siblings, and is now passed on to me. As you can see, it has survived a lot of use throughout the years. However, not in bad condition, at all!


Here it is pictured after painted and dressed with new hardware. Not too shabby, eh?


A peek at one wall of the guest room. Now the dresser pops against the white wall.


Short post--but more on this room to come.

Saturday, July 30, 2011

Bathroom Floor

It is always the old trends that come around to haunt us. In this case: HONEYCOMB flooring. This tile work was in my upstairs bathroom, and although it was in okay condition, it never seemed to feel clean due to the grout creases. Also, because of the light color, you could see any, and every, little piece of dirt on the floor [I'm not going to pretend my house is kept immaculate]. Also, much of the tile is chipping, which causes it to look even dirtier. Since a complete remodel for this bathroom is waaay down the line, I thought I would do something easy and inexpensive.

Here is a picture of what the bathroom looked like with the honeycomb tile. 

Laying out the tiles, trying to get a feel for what I will need to trim.

Almost done...

And after it's all in. The lighting doesn't really do the color or pattern justice, but the darker shade of brown makes the vanity pop. 

I like the contrast of the dark flooring against the teal-ish tiles and white fixtures. I just couldn't understand the yellow flooring..

It just looks/feels so much cleaner! 

I found these tiles at a local discount store for less than $20. It took me about an hour and a half (after spending most of the time cutting edges) to completely lay down.  I would say it was well worth the time and effort! An excellent temporary solution until I can afford my dream bathroom (ha). 

Monday, July 4, 2011

A Very Happy 4th!

We have finally reached the last stretch of our endeavours!  Here are the updates since my last post:

Wanted to give the tree in the front yard some uniformity too.. but it takes a lot to make this thing look under control! Before, it was basically vines growing from the bottom into the grass.
I went ahead and put a little bit of edging around the tree to contain most of the vine-like plants at the bottom. I'm hoping to next year, really focus on getting rid of the weeds and planing flowers in it -- unfortunately, I can only do one project at a time!

Finished up the patio with a bench, a few pots of flowers, and some landscape timber. It's quite relaxing out there--and in the shade all day long!

So the light fixture that I like most held the lights at an awkwardly low level. So, I checked to see if raising it was an option. Dad was able to build this awesome stand that raised it! I decided to disguise it with a planter and flowers.. happened to find one that matched the fixture exactly. Yay!

Installing the electric for this light, and the pool light.

Getting it put together...

Voila! All put together!

...and after planting flowers.


Funny story: The same day that we finished this structure, I had to make a trip to ACE Hardware to grab a few things... and look what was staring at me as I waited in line! If you look behind the blue chair you will notice a light fixture... fixed in a planter. I do have to say though, ours looks way better-- and better quality, I'm sure!

Painted new skimmers!

 In the process of painting steps and parts of the floor...

Getting ready to install the new filter. The old one (front) was cracked from not having any protection from the sun, and also too small for a pool this size. New filter (standing awesomely in the back) is ready for the task.

The plumbing for the new filter system: 2 skimmers, 1 drain and 3 returns, none of which were there previously. Working by the light of my cell phone, we finished this project up at just past midnight that night.
Side note, there is also now an automatic chlorine feeder that is built into this..where the long pipe is on the far left.

POWERWASH!! ... (ew.. Go Dad!)

Aaannnd after a day or two of cleaning, balancing chemicals, and troubleshooting the plumbing and electric, we are open for business! This is a picture I took of Erik's cannonball. Whoops!

A sad excuse for a volleyball net, but it's still fun! Especially watching these hooligans play.

Imani and her friend Arianna came over to swim too! ... Kali's chillin in the background.
After removing the huge piles of dead leaves that had taken over my patio -- it's amazing how much bigger it makes it look when it's actually clear...

Still needing to clean up a few things. Definitely need more plants or some kind of color next summer.

Extra seating area.


Needless to say, I am one happy girl!!

I am sooo thankful for all of the hard work that my Dad put into this -- he's awesome. Thanks to my brothers too for giving up some of their weekends to help out! Love you all, and can't wait to enjoy this with you guys from here on out!